The Perfect Tennis Serve in 8 Steps
The serve is by far the most important stroke in tennis. It’s the shot with which every rally begins, so without it, no real tennis game would be possible. With a good serve, you can dictate the rally from the beginning, giving you a tactical advantage.
Even though the serve has the greatest influence on the game, it is also the most demanding stroke for most tennis players. Technically speaking, several movements have to fit together to hit the ball optimally.
With this guide you will learn how to serve in 8 easy steps. This will help you make your serve your strength in the match.
1. Position
Depending on the score, the serve is made from the right or left side. You have to play the ball diagonally into your opponent’s Service box. We now assume that you will serve from the deuce court, i.e. from the right.
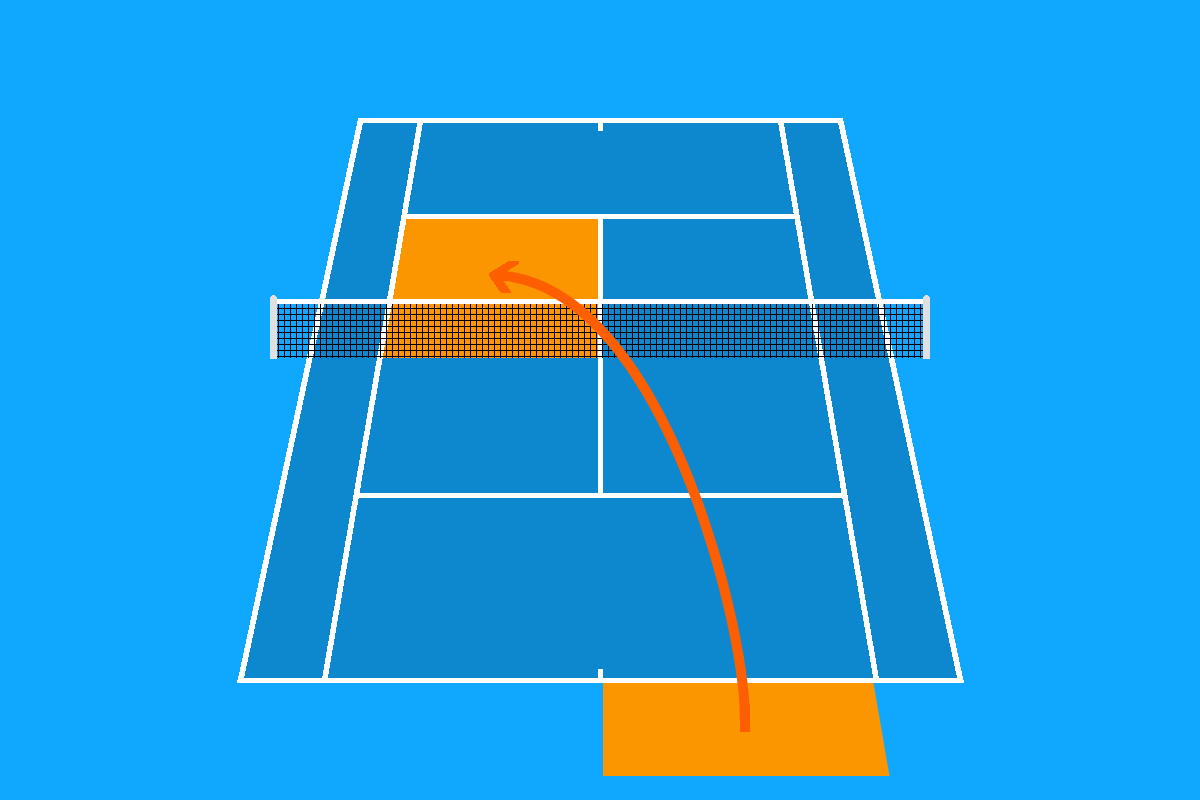
Basically you always stand to the side of the baseline when you serve. To do this, go to the yellow field. This is the allowed area for the serve. We recommend that you position yourself as close as possible to the center mark.
The advantage here is that you are already standing in the middle of the court immediately after your serve. This is the best starting position for the next shot. If you were serving from an outside position, you would have to run to the middle of the court after your serve.
2. Stance
Now place your left foot as close as possible to the baseline. It is important that you don’t touch the baseline with your foot. Otherwise you risk a foot fault. Your left foot should point towards the right net post. Your right foot should be parallel to the baseline. Place it slightly offset behind your left foot.
For left-handers, the exact opposite is true. In this case the right foot is on the baseline and points to the left net post. Accordingly, the rear left foot is parallel to the baseline.
In general, the correct foot position is the basic requirement for a secure stance on serve. In the course of time, two different stances have developed, which you can adopt when serving. One is the “platform stance” and the other the “pinpoint stance”.
Platform Stance
We have already described the platform stance above. In this variation your feet are standing about shoulder width apart. During the whole serve they do not move from the spot. Here, you just bend your knees after you tossed the ball.
In general, this foot position offers you a high degree of stability. This gives you more control and allows you to place the balls more accurately on the court. However, you can’t get the maximum swing out of the shot with this stance.
Pinpoint Stance
For the pinpoint stance, the starting position is the same as for the platform stance. The only difference is that after tossing the ball, you pull your back foot Forward. Before you jump up, your two feet must be together.
The big advantage of this stance is that you get a lot of momentum into the ball. This creates a very fast and powerful serve. On the other hand, stability suffers as a result. Since you are standing on one point with both feet, it is more difficult to keep your balance. This leads to less control when serving.
3. Grip
Another important point when serving is the choice of the right grip. In general you should choose the so-called “Continental grip” for the serve. This is also used for the backhand. There is a trick how to find the Continental grip in the shortest time:
Take your dominant hand and stretch your thumb and index finger apart so that a “V” is formed. Hold the tennis racket with the other hand perpendicular to the ground. The next step is to place your hand with the “V” in the middle of the racket frame.
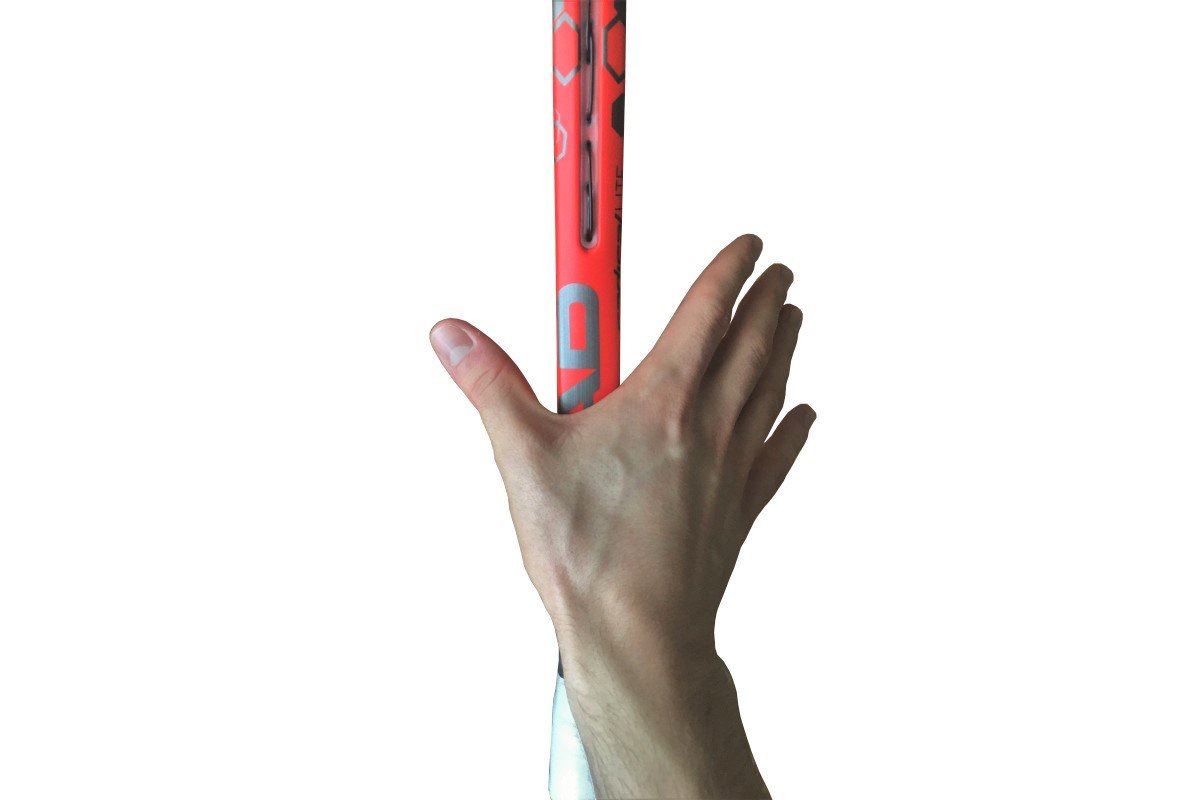
Then you move your hand down to the end of the grip.
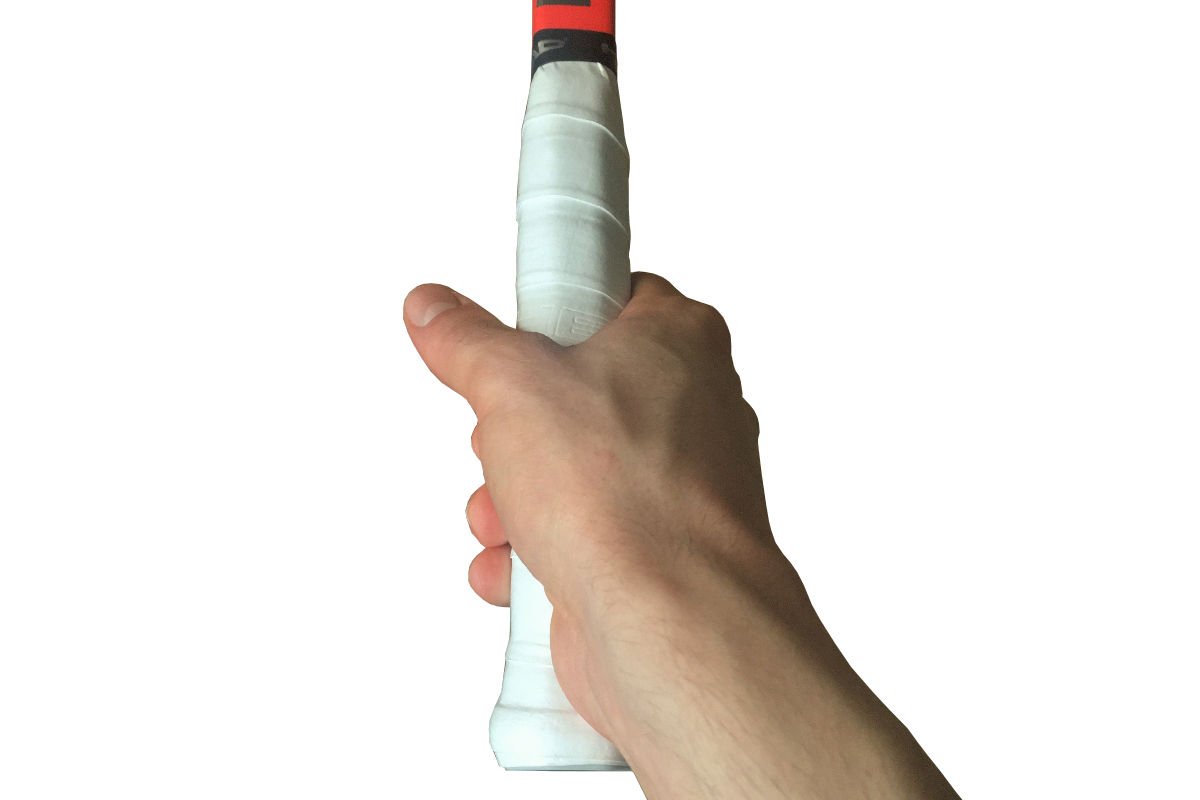
This is the correct position. Now it feels like if you’re holding a hammer in your hand.
4. Ball Toss
A precise ball toss is essential for the ideal serve. The right tossing height is decisive here. On the one hand, you should’t toss the tennis ball too high, otherwise you would have to slow down or interrupt the swing movement. On the other hand, the toss shouldn’t be too low. Because then you do not have enough time to execute the stroke movement.
In principle, the ball is tossed up a little in front of the body, so that it is easier to move forward when it comes into contact with the ball. You start the toss by extending your arm towards the net. Thereby, you hold the tennis ball with your fingertips.
Then move your arm vertically upwards. At eye level, you then release the ball. Your arm still swings upwards and points in the direction of the ball.
We advise you to practise tossing the ball several times until you achieve a consistent throw.
5. Backswing
In the next steps we will describe the motion sequence for a right-hander. As a left-hander you just have to think the other way around.
You are standing at the baseline and holding the racket in your right hand at hip level. In the starting position you also hold the tennis ball with your left hand on the racket. Now stretch out your left arm with the ball forward and take the toss. You look up and aim at the ball.
At the same time, you extend your right arm backwards with the racket. In this case, the backswing movement resembles a loop. First, lower the racket slightly until the tip of the racket is facing the ground. Then you swing it up in an arc to behind your back.
Meanwhile you should also bend your knees to prepare for the jump.
6. Follow Through
The moment the ball reaches its highest point in the air is the sign for you to follow through. You push your feet off the ground and jump up.
At the same time, you stretch your right arm upwards and swing the racket forward to the ball. Your body should be stretched to the maximum. On contact with the ball, your wrist will snap down and you will drop your right arm. A loose wrist is very important for this reason.
In the last step, you swing the racket down and turn your upper body to the left. Overall, you should make sure that you execute all movements smoothly and without interruptions.
After your feet have landed on the ground, get ready for the next shot.
7. Placement
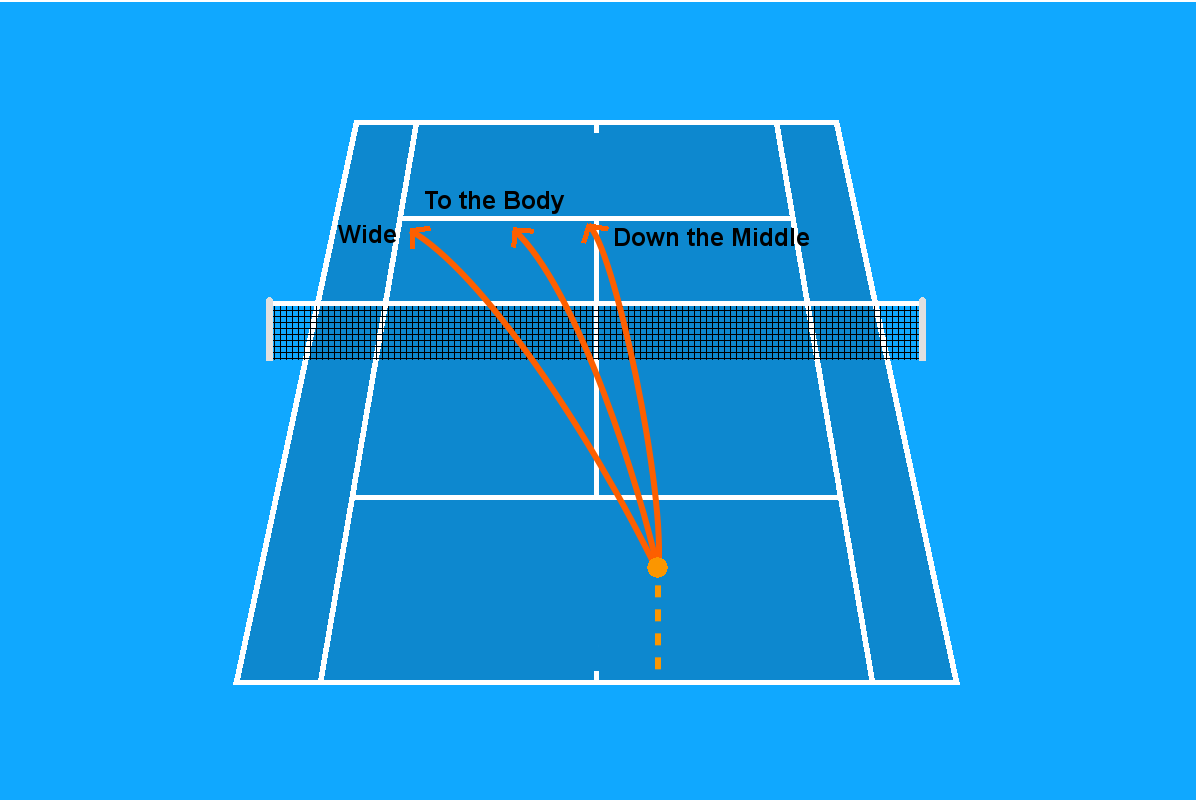
Before each serve, you should consider where you want to place the ball in the service box. The box is not that big, but you can often surprise your opponent by cleverly varying your serves. The following options are available to you:
- Out wide
- Down the middle
- To the body
Serving Out Wide
In this variation, you serve the ball far out wide to force your opponent out of the court. It takes a long time for him to get back to the centre of the court. This opens up the court for you, so you can hit the next shot into the open space.
Serving Down the Middle
The term “Down the middle” refers to a serve that lands near the center service line. This gives your opponent less chance to use an angle on his return. Most likely, the ball will come back to you through the middle. An additional advantage is that the ball’s path through the middle is the shortest and the net hangs lowest.
Serving to the Body
Here you serve the ball in the direction of your opponent Accordingly, you usually play the ball centrally into the service area. If the ball comes directly at your opponent’s body, he or she hast to dodge the ball first. He hardly has time to make a good return. The result: his return is too short, which gives you a chance to attack.
8. Type
As with the other basic strokes, you can add some rotation to the ball whes serving. Combine spin with well-placed shots and you have a very effective serve. In summary, there are three different types to choose from:
- Flat serve
- Kick serve
- Slice serve
Depending on the variation, the characteristics and the ball toss differ.
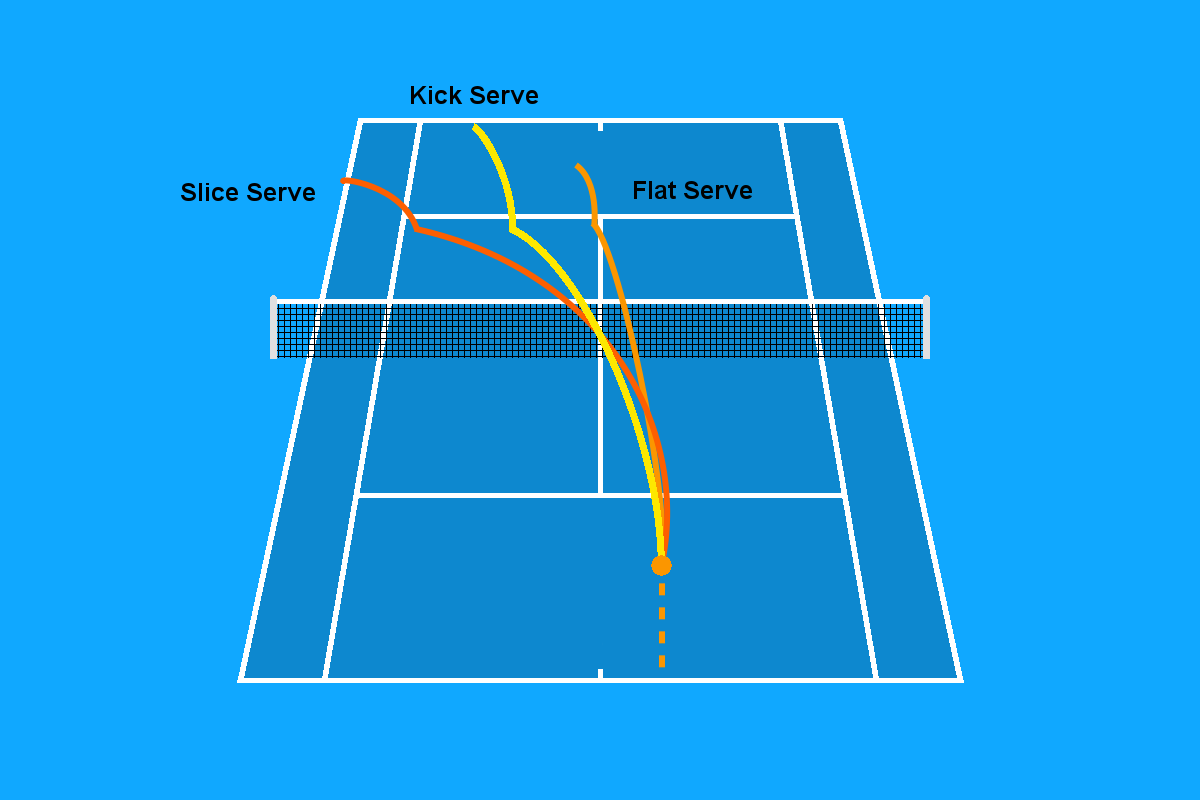
Flat Serve
Of all three types, the flat serve is the one with the highest speed. It is relatively easy to play because the ball is hit without spin. Therefore its trajectory is relatively stright. On this serve, the ball toss has no special features.
Kick Serve
The second option is the kick serve. It is also called the topspin serve because you play the ball with a forward rotation. A characteristic feature of the kick serve is that the ball bounces high off the ground and is therefore difficult to return. For a kick serve, you have to throw the ball a little to the left.
Slice Serve
Furthermore, you have the possibility to play a slice serve. You can recognize this by an arc-shaped flight curve. The arc is created by a side spin of the tennis ball. In this variation, the ball is thrown slightly to the right.
Feeling good with your serve? Then go over to the forehand.